If you've heard the TED talk by Liz Gilbert on the creative genius, you'll know what I mean when I say I've been hit by the genius--more than once, if you can believe it--regarding this blog post, every time in the most inconvenient of places, as it seems to go; which means I could not capture the genius. It got away. So instead I'm left with whatever I can force out, and you are left with what follows:
My husband and I received his parents' old oak dining table and chairs upon our move to Indiana--a beautiful set that had been in storage. I appreciated the craftsmanship, but in general I have never liked the oak color and so intended to refinish the table.
The big project finally happened, and immediately I have to declare that it is a very, very good thing I did not try to take on this project alone. I would have ended up with a half-sanded dismantled oak table and an ulcer. As it was, my parents came to town to help us move in and I'm left with a nearly perfect refinished oak table. (And a personal declaration that I will never again take on a "DIY" this big.)

About the nearly perfect: at the project finish line, I made a major mistake that resulted in my re-learning a few vital life principles. I have thought about these principles daily since the debut of le tableau des horreurs:
#1--The first is pretty obvious. Go with your gut, listen to Jiminy Cricket, and all other cliches about conscience. It's a real thing, y'all.
#2--However, in order to succeed at #1, you must succeed at #2, and this lesson was perhaps the most acute of all: break rhythm.
I am a dancer. I always will be, even if my body can no longer do what my soul wants it to. I am a pianist. Rhythm matters to me. My rhythm is a powerful force, causing my husband to get home from work and say, "You got how much done today?!" But it can also hurt me. Recently, my husband brought to my attention the need to get out of rhythm, to step back and consider. He said this as I was about to dig in to a giant bowl of ice cream that I knew before first bite I would regret. He told me that just because the ice cream was scooped, the spoon in hand, my mouth open, I did not have to eat the ice cream. I could simply put it back in the freezer for later. This is probably obvious to all of you, but I had a major paradigm shift. I am a committed person and a finisher. I plan to eat a bowl of ice cream, I follow through to the bowl being licked clean (okay, not quite, but you know) even as the little voices in my head (you guys have those too, right?) are frantically waving (apparently they also have arms) at me to stop, stop! you will regret this! while I squash them out with the sound of my train engine plowing (like this sentence) through my commitment. Are you exhausted yet? I didn't realize I was until I began to see in my daily routine where that drive and rhythm was not actually helping me.
Rhythm is important. Sometimes it needs breaking.
#3--Slow down. In order to break rhythm, you have to slow your thought processes down enough to acknowledge those little voices and decide if they need heeding. Deliberate and realize that just because you have committed to a thought in your head does not mean it cannot be reversed before it reaches your hands (or your mouth, as in the Case of the Ice Cream).
#4--As a help-meet to slowing down, ask questions. Doubt, wonder, contradict, reconfigure, ask some more. Be a gatherer of information.
#5--It'll all work out. God often sends you little hints to help make your life easier, but these do not determine absolute outcomes. (The heavenly messages that do are a different topic.)
By now you are probably wondering what any of this has to do with a giant solid wood dining table.
I'll spare you the details of the actual table transformation since this is not a how-to post, so let's fast forward--

(gotta keep that hair protected...)


I spent the next two days sanding that baby back down to the second coat of varnish, wearing away all of my fingernails in the process. The perfectly smooth surface was irretrievable and I had to touch up some areas with more stain, but eventually it was prepped once again for the real final coat of varnish.


My husband and I received his parents' old oak dining table and chairs upon our move to Indiana--a beautiful set that had been in storage. I appreciated the craftsmanship, but in general I have never liked the oak color and so intended to refinish the table.
 |
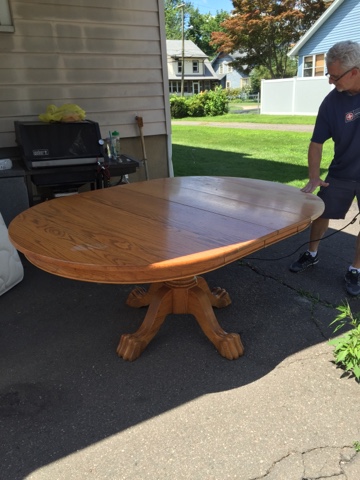
| I never remember to take before pictures. We know this. This is the only picture I could find. |

Pay attention to your instincts
Break rhythm
Ask questions
Slow down
It'll all work out
#1--The first is pretty obvious. Go with your gut, listen to Jiminy Cricket, and all other cliches about conscience. It's a real thing, y'all.
#2--However, in order to succeed at #1, you must succeed at #2, and this lesson was perhaps the most acute of all: break rhythm.
I am a dancer. I always will be, even if my body can no longer do what my soul wants it to. I am a pianist. Rhythm matters to me. My rhythm is a powerful force, causing my husband to get home from work and say, "You got how much done today?!" But it can also hurt me. Recently, my husband brought to my attention the need to get out of rhythm, to step back and consider. He said this as I was about to dig in to a giant bowl of ice cream that I knew before first bite I would regret. He told me that just because the ice cream was scooped, the spoon in hand, my mouth open, I did not have to eat the ice cream. I could simply put it back in the freezer for later. This is probably obvious to all of you, but I had a major paradigm shift. I am a committed person and a finisher. I plan to eat a bowl of ice cream, I follow through to the bowl being licked clean (okay, not quite, but you know) even as the little voices in my head (you guys have those too, right?) are frantically waving (apparently they also have arms) at me to stop, stop! you will regret this! while I squash them out with the sound of my train engine plowing (like this sentence) through my commitment. Are you exhausted yet? I didn't realize I was until I began to see in my daily routine where that drive and rhythm was not actually helping me.
Rhythm is important. Sometimes it needs breaking.
#3--Slow down. In order to break rhythm, you have to slow your thought processes down enough to acknowledge those little voices and decide if they need heeding. Deliberate and realize that just because you have committed to a thought in your head does not mean it cannot be reversed before it reaches your hands (or your mouth, as in the Case of the Ice Cream).
#4--As a help-meet to slowing down, ask questions. Doubt, wonder, contradict, reconfigure, ask some more. Be a gatherer of information.
#5--It'll all work out. God often sends you little hints to help make your life easier, but these do not determine absolute outcomes. (The heavenly messages that do are a different topic.)
By now you are probably wondering what any of this has to do with a giant solid wood dining table.
I'll spare you the details of the actual table transformation since this is not a how-to post, so let's fast forward--
past the sanding
(gotta keep that hair protected...)
and staining
to the varnishing.
The evening before my parents' departure, we stood around the table admiring it. We had three coats of varnish applied to the table and it looked beautiful. It was complete. We had been working for six days on this thing. Yet in a moment of over-protective haste, we decided to add a fourth coat that night. Both my dad and I had the gut feeling to stop! put away the ice cream! you'll regret this! But we were in rhythm, our supplies handy. We were eager--my parents flew home the next morning. My dad is quite a handy man, and I didn't question.
So that night I added fourth coat of varnish by the light of the garage and a cell phone flashlight (are you cringing? you should be), unknowingly setting myself up for hours of extra reconstructive work.
The next morning we went out to check our work before my parents left town and discovered a bubbled, streaked, tacky mess.

All of our work over the last few days had been undone in one evening. Standing there filled with regret and disappointment, I recalled each feeling of warning from the night before. We would have to sand down to the earliest layer of varnish and try again.
But wait, wasn't my dad leaving? Yep. He gave me some instructions, a vote of confidence, and flew away with my mom to the other side of the country.

All of our work over the last few days had been undone in one evening. Standing there filled with regret and disappointment, I recalled each feeling of warning from the night before. We would have to sand down to the earliest layer of varnish and try again.
But wait, wasn't my dad leaving? Yep. He gave me some instructions, a vote of confidence, and flew away with my mom to the other side of the country.

I think I held my breath with every stroke across that table.

Finally finished, with the flaws hidden enough to the ignorant eye, I was reminded that things work out. Sometimes you just have to change your expectations. It is strange that a table refinish can be so instrumental in my character development, but I'm glad for it.

God is forgiving.
So is oak.
Thank goodness for sand paper, mineral spirits, and dads.


PS--If I ever break my word and refinish a table this big again, I need to remember:
Use two brushes when varnishing--one for each side. The brush gets too heavy with varnish.
Tape the hardware
Wear that mask when sanding. Gross!
Wear that mask when sanding. Gross!